After the recent judgment by the Supreme Court on the role of Aadhaar for verification, the Unique Identification Authority of India (UIDAI) has come up with a new offline identity verification method – ‘Aadhaar Paperless Local e-KYC’. Under the method, there is no need for a person to share his biometrics or the Aadhaar number. The new method enables the government to foster user identity privacy and marks a change of mindset in the way that the Govt. hopes to connect identities to policies.
What is the Paperless local e-KYC method?
As per the UIDAI website, the paperless local e-KYC method requires the creation of a digitally signed XML that offers a document that is securely shareable via a phone or computer. The XML can be used for offline identity verification by any person holding an Aadhaar number. All an Aadhaar holder needs to do is download the XML file and use it for the purpose of verification. The file is a digitally signed document which has all the Aadhaar related information that can be generated by the person as and when needed without the Aadhaar number.
The XML file will only consist of the name and address, however, the Aadhaar holder can choose among the different details like date of birth, gender, photo, mobile number, and email. After the data gets downloaded from the UIDAI website, the file can be used for verification.
How FeetPort can help?
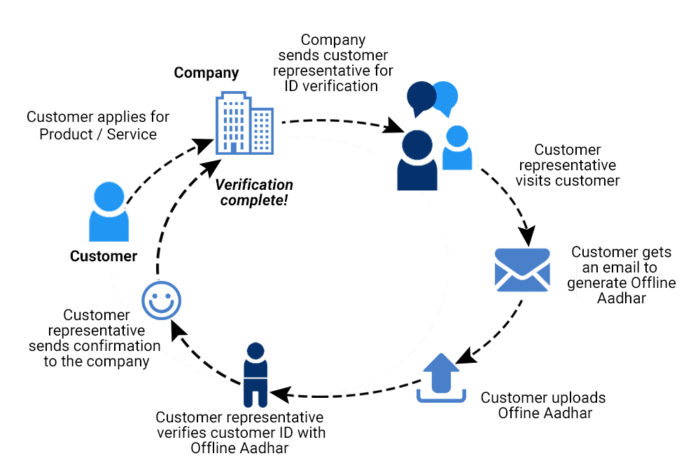
- Firstly, the organization representative will either visit your home or you will have to make your way to the store for the eKYC process.
- The organization representative will ask for your email id to be added in the digital form present in the FeetPort application.
- Once you provide the email id, he will click on the ‘Request to Access’ button. This will send you an email that consists of two hyperlinks that will redirect you to the further steps or process that needs to be followed.
- One of the hyperlinks will redirect you to the secure UIDAI website where you will have to follow certain steps. On the page, you will have to enter your Aadhaar number or Virtual ID.
- Now enter the security code and then click on ‘Send OTP’. You will receive the OTP on your Aadhaar registered mobile number.
- Once you receive the OTP, enter it in the text box next to ‘Enter OTP/TOTP’. Now the OTP will get validated. Below you will find a new tab similar to the one formed in ‘Current Situations’ where you will be asked to enter your password. Over here you can create your own password.
- Finally, you will get the option to download the XML file. Now once the file has been downloaded the next step is to upload it on the second hyperlink mentioned above.
- Once the XML file is uploaded successfully, the organization representative will get the information required for verification purposes.
Summing Up
The ‘Aadhaar Paperless Local e-KYC’ method ensures that no sort of data is made available to the representative visiting for verification purpose. Instead, all the data is stored on the phone or computer of a person and only the digital format of the data is sent to the representative and used further for the verification process.
